

As we move forward into the age of sustainability, finding ways to preserve or breathe new life into the things around us is becoming increasingly popular. And, thanks to the wonders of YouTube and TikTok, the endless stream of inspirational ideas and tutorials at our fingertips has just about everyone believing that they too can refurbish a worn-out dresser or create the coffee table of their dreams from a discarded shipping pallet.
But is it really as simple as these viral 90-second videos make it out to be, or is there more to it?
Better yet, is there a difference between what makes a great DIY project – and when you should seek professional help?
I sat down with two Bermuda craftsmen to strip away the hype and get some “pro tips” for working with different types of wood.
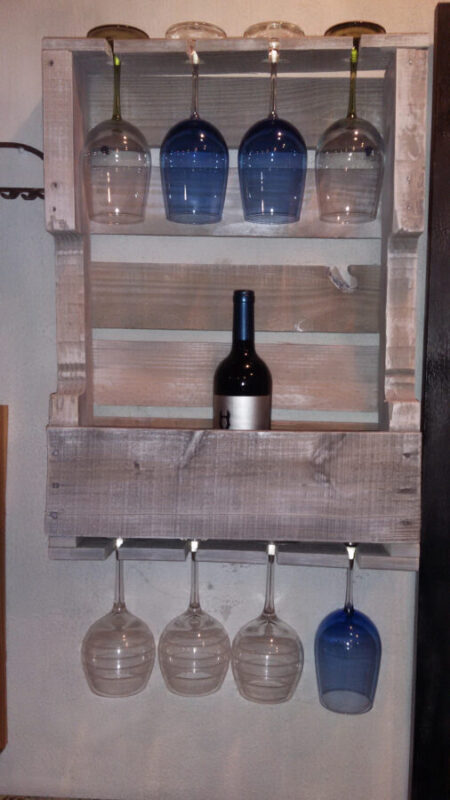
Jason Carlington, owner of the Palletable Bermuda Facebook Page first started creating furniture out of discarded pallets during the pandemic as a way to provide for his family. “It was really my wife Danielle who inspired me,” he admits. “She brought me a photo of a wine bottle rack and asked me if I could make it for our kitchen.”
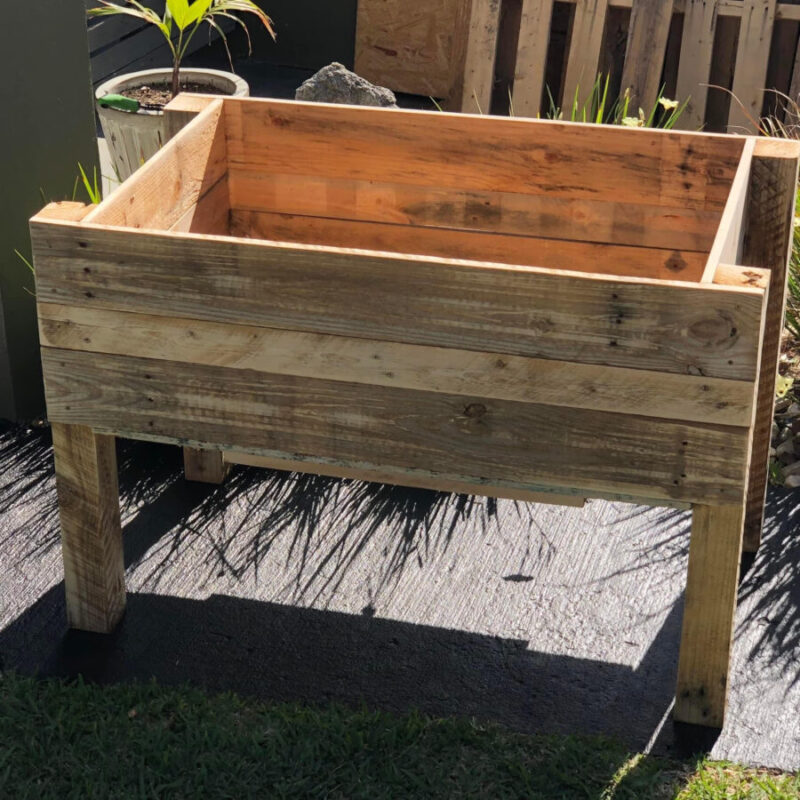
The success of this first simple project got them thinking about other items that they could create from designs that were inspired by images that they found online. “A lot of people have taken an increased interest in spending time outside, so I sold quite a few raised planters as well as rustic outdoor furniture,” he explained.
 UPCYCLING RECLAIMED WOOD
Working with pallet wood can be a rewarding experience, and it is also relatively easy to find discarded pallets in Bermuda as just about every importer has a stack of them piled behind their warehouse.
It is important to choose ones that are in reasonably good condition unless you really want to achieve a rustic weathered look for your finished creation.
“It might surprise some people to learn that disassembling the pallet can be the most time-consuming part of any project,” says Mr. Carlington. “The nails and screws come out of a new pallet much more easily than one that has been sitting outside for years.”
“I recommend using a crowbar or hammer and a wood chisel to disassemble the pallet – although a reciprocating saw, or a jigsaw might be required to cut a few of the more stubborn nails,” he explained.
“There is a lot of variation in how they are assembled but as a rule you can try knocking the planks from the backside to expose the nail heads a bit and then pry them off with a chisel,” he says.
 TIPS FOR BUILDING WITH PALLET WOOD
• Keep in mind that pallet wood typically has rough edges, and it may be necessary to sand all sides of the boards to avoid splinters.
• Take the time to sketch a detailed plan or blueprint for your furniture piece before starting, which will help you measure accurately and minimize mistakes and make a cut list before you begin sawing up the lengths.
• Remember to give some thought as to how your finished piece will be mounted.
• Be sure to apply an appropriate indoor or outdoor finish depending on the intended use or placement of your finished piece.
• The basic tools required include: a tape measure, hand saw, power drill (or screwdriver), safety goggles and gloves.
Yearning to give that thrifted coffee table a much-needed facelift?
Anthony Madeiros of BSR Group Ltd. in Devonshire recommends that you make sure that you take time to consider what you want your finished project to look like and understand what you are getting into before you start.
“The most important thing is to figure out what type of wood the piece is constructed from, before contemplating any changes,” says Mr. Madeiros. “If the piece is made of pine there is not too much that can go wrong that cannot be fixed, but if the item is made of plywood or MDF your options will be much more limited,” he explains.
If the piece you want to work on is an antique, it is not advisable to do any work on it without first gaining an understanding of its value.
“Particularly if it is made of antique mahogany or Bermuda cedar, the best thing to do is get in touch with us so that we can assist in determining its value and make some recommendations regarding a plan of restoration,” says Mr. Madeiros.
“A full restoration process involves taking the entire piece apart so that the finish can be cleaned using the correct techniques so that the original finish and patina are preserved,” he says. “A lot of people don’t realize that when you are preserving an antique piece of furniture you need to utilize old joinery techniques and animal hide glue.”
TIPS FOR REHABBING THRIFTED FURNITURE
As a rule of thumb, understand that working on wooden furniture is a fairly physical activity and be prepared for the whole endeavour to take more time than you expect.
That said, applying a fashionable chalk paint finish to a piece of thrifted furniture is a simple four-step process involving sanding down the piece, applying a coat of primer, applying the chalk paint, and then sealing the piece with wax to stop it generating dust.
Be aware that products for stripping the old finish off furniture use harsh chemicals that can cause nasty burns – it is essential to wear a mask, gloves, eye protection and a rain jacket to protect yourself from splashes, and all the resulting residue that is scraped off needs to be collected in an old paint can and disposed of responsibly.
When it comes to general maintenance, many manufactured cleaning products actually do more harm than good. Mr. Madeiros recommends only using Goddard’s Cabinet Makers Wax for cleaning and waxing furniture as it stops the wood from drying out.
For Further Information Contact:
Jason Carlington – https:// www.facebook.com/palletablebermuda
Anthony Madeiros – BSR Group Ltd. 236-2886